
With the release of Unified Labeling in Azure and M365, there is now a way to protect your data and label your data appropriately for confidentiality and encryption for your files shares and files on your on premises devices. The following shows how to install the latest AIP_UL client and configure it in Azure to apply those Unified Labeling Policies.
This is a detailed process and I had some issues myself with getting the process simplified. I will do my best here to make this as smoot has possible with as many reference documents that I can input. Always feel free to comment as this data is ever changing and updating as Microsoft updates the offering.
Prerequisites
Please refer to this document for a full list of pre-requisites before deploying the scanner:
https://docs.microsoft.com/en-us/azure/information-protection/deploy-aip-scanner-prereqs
For the basics we have the following:
The prerequisites below are still required for successful AIP scanner installation.
- A Windows Server 2012 R2 or greater Server to run the service
- Minimum 4 CPU and 4GB RAM physical or virtual.
NOTE: More RAM is better. The scanner will allocate RAM 2.5-3 times of size of all files being scanned in parallel. Thus, if you scan 40 files that are 20MB each at the same time, it should take about 202.540=2GB RAM. However, if you have one big 1GB file it can take 3GB of RAM just for that file.
- Minimum 4 CPU and 4GB RAM physical or virtual.
- Internet connectivity necessary for Azure Information Protection
- A SQL Server 2012+ local or remote instance (Any version from Express or better is supported)
- Sysadmin role needed to install scanner service (the user running Install-AIPScanner, not the service account)
NOTE: If using SQL Server Express, the SQL Instance name is ServerName\SQLExpress.
NOTE: At this time, a different SQL instance is needed for each AIP Scanner node.
- Sysadmin role needed to install scanner service (the user running Install-AIPScanner, not the service account)
- Service account created in On Premises AD (I will call this account AIPScanner in this document).
- Service requires Log on locally right and Log on as a service right (the second will be given during scanner service install).
- Service account requires Read permissions to each repository for discovery and Read/Write permissions for classification/protection.
- AzInfoProtection_UL.exe is available on the Microsoft Download Center (The scanner bits are included with the AIP Client)
- The Azure AD Preview PowerShell module. From the machine you’re installing AIP Scanner on, run the following from an Administrator PowerShell:
1 | Install-Module AzureADPreview |
Configure the scanner in the Azure portal
Before you install the scanner, or upgrade it from an older general availability version, configure or verify your scanner settings in the Azure Information Protection area of the Azure portal.
To configure your scanner:
- Sign in to the Azure portal with one of the following roles:
- Compliance administrator
- Compliance data administrator
- Security administrator
- Global administrator
Then, navigate to the Azure Information Protection pane. For example, in the search box for resources, services, and docs, start typing Information and select Azure Information Protection.
- Create a scanner cluster. This cluster defines your scanner and is used to identify the scanner instance, such as during installation, upgrades, and other processes.
- Scan your network for risky repositories. Create a network scan job to scan a specified IP address or range, and provide a list of risky repositories that may contain sensitive content you’ll want to secure. Run your network scan job and then analyze any risky repositories found.
- Create a content scan job to define the repositories you want to scan.
Create a scanner cluster
- From the Scanner menu on the left, select Clusters
 .
. - On the Azure Information Protection – Clusters pane, select Add
 .
. - On the Add a new cluster pane, enter a meaningful name for the scanner, and an optional description. The cluster name is used to identify the scanner’s configurations and repositories. For example, you might enter Europe to identify the geographical locations of the data repositories you want to scan. You’ll use this name later on to identify where you want to install or upgrade your scanner.
- Select Save
 to save your changes.
 - On the Add a new cluster pane, enter a meaningful name for the scanner, and an optional description. The cluster name is used to identify the scanner’s configurations and repositories. For example, you might enter Europe to identify the geographical locations of the data repositories you want to scan. You’ll use this name later on to identify where you want to install or upgrade your scanner.
- Select Save to save your changes.
Create a network scan job (public preview)
Starting in version 2.8.85.0, you can scan your network for risky repositories. Add one or more of the repositories found to a content scan job to scan them for sensitive content.
Note: The network discovery interface is currently in gradual deployment and will be available in all regions by September 15, 2020.
Network discovery prerequisites
| Prerequisite | Description |
|---|---|
| Install the Network Discovery service | If you’ve recently upgraded your scanner, you may need to still install the Network Discovery service. Run the Install-MIPNetworkDiscovery cmdlet to enable network scan jobs. |
| Azure Information Protection analytics | Make sure that you have Azure Information Protection analytics enabled. In the Azure portal, go to Azure Information Protection > Manage > Configure analytics (Preview). For more information, see Central reporting for Azure Information Protection (public preview). |
Creating a network scan job
- Log in to the Azure portal, and go to Azure Information Protection. Under the Scanner menu on the left, select Network scan jobs (Preview)
 .
. - On the Azure Information Protection – Network scan jobs pane, select Add .
- On the Add a new network scan job page, define the following settings:
Network scan job name: Enter a meaningful name for this job. This field is required.
Description: Enter a meaningful description.
Select the cluster: From the dropdown, select the cluster you want to use to scan the configured network locations.
Tip: When selecting a cluster, make sure that the nodes in the cluster you assign can access the configured IP ranges via SMB.
Configure IP ranges to discover: Click to define an IP address or range.
In the Choose IP ranges pane, enter an optional name, and then a start IP address and end IP address for your range.
Tip: To scan a specific IP address only, enter the identical IP address in both the Start IP and End IP fields.
Set schedule: Define how often you want this network scan job to run.
If you select Weekly, the Run network scan job on setting appears. Select the days of the week where you want the network scan job to run.
Set start time (UTC): Define the date and time that you want this network scan job to start running. If you’ve selected to run the job daily, weekly, or monthly, the job will run at the defined time, at the recurrence you’ve selected.
Note: Be careful when setting the date to any days at the end of the month. If you select 31, the network scan job will not run in any month that has 30 days or fewer. - Select Save to save your changes.
Tip: If you want to run the same network scan using a different scanner, change the cluster defined in the network scan job. Return to the Network scan jobs pane, and select Assign to cluster to select a different cluster now, or Unassign cluster to make additional changes later.
Analyze risky repositories found
Repositories found, either by a network scan job, a content scan job, or by user access detected in log files, are aggregated and listed on the Scanner > Repositories repositories icon pane.
If you’ve defined a network scan job and have set it to run at a specific date and time, wait until it’s finished running to check for results. You can also return here after running a content scan job to view updated data.
- Under the Scanner menu on the left, select Repositories
 .
.
The repositories found are shown as follows:- The Repositories by status graph shows how many repositories are already configured for a content scan job, and how many are not.
- The Top 10 unmanaged repositories by access graph lists the top 10 repositories that are not currently assigned to a content scan job, as well as details about their access levels. Access levels can indicate how risky your repositories are.
- Do any of the following:
 Select Columns to change the table columns displayed.
 If your scanner has recently run network scan results, select Refresh to refresh the page. Select one or more repositories listed in the table, and then select Assign Selected Items to assign them to a content scan job.
Filter The filter row shows any filtering criteria currently applied. Select any of the criteria shown to modify its settings, or select Add Filter to add new filtering criteria. Select Filter to apply your changes and refresh the table with the updated filter. In the top-right corner of the unmanaged repositories graph, click the Log Analytics icon to jump to Log Analytics data for these repositories.
Repositories with public access
Repositories where Public access is found to have read or read/write capabilities may have sensitive content that must be secured. If Public access is false, the repository not accessible by the public at all.
Public access to a repository is only reported if you’ve set a weak account in the StandardDomainsUserAccount parameter of the Install-MIPNetworkDiscovery or Set-MIPNetworkDiscovery cmdlets.
- The accounts defined in these parameters are used to simulate the access of a weak user to the repository. If the weak user defined there can access the repository, this means that the repository can be accessed publicly.
- To ensure that public access is reported correctly, make sure that the user specified in these parameters is a member of the Domain Users group only.
Create a content scan job
Deep dive into your content to scan specific repositories for sensitive content.
You may want to do this only after running a network scan job to analyze the repositories in your network, but can also define your repositories yourself.
- Under the Scanner menu on the left, select Content scan jobs.
- On the Azure Information Protection – Content scan jobs pane, select Add .
- For this initial configuration, configure the following settings, and then select Save but do not close the pane.
Content scan job settings
– Schedule: Keep the default of Manual
– Info types to be discovered: Change to Policy only
– Configure repositories: Do not configure at this time because the content scan job must first be saved.
Policy enforcement
– Enforce: Select Off
– Label files based on content: Keep the default of On
– Default label: Keep the default of Policy default
– Relabel files: Keep the default of OffConfigure file settings– Preserve “Date modified”, “Last modified” and “Modified by”: Keep the default of On
– File types to scan: Keep the default file types for Exclude
– Default owner: Keep the default of Scanner Account - Now that the content scan job is created and saved, you’re ready to return to the Configure repositories option to specify the data stores to be scanned. Specify UNC paths, and SharePoint Server URLs for SharePoint on-premises document libraries and folders.
Note: SharePoint Server 2019, SharePoint Server 2016, and SharePoint Server 2013 are supported for SharePoint. SharePoint Server 2010 is also supported when you have extended support for this version of SharePoint.
To add your first data store, while on the Add a new content scan job pane, select Configure repositories to open the Repositories pane: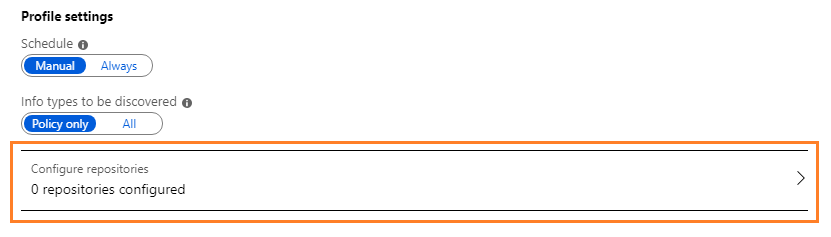
- On the Repositories pane, select Add:

- On the Repository pane, specify the path for the data repository, and then select Save.
- For a network share, use
\\Server\Folder. - For a SharePoint library, use
http://sharepoint.contoso.com/Shared%20Documents/Folder. - For a local path:
C:\Folder - For a UNC path:
\\Server\Folder
Note: Wildcards are not supported and WebDav locations are not supported.
- For a network share, use
- If you add a SharePoint path for Shared Documents:
- Specify Shared Documents in the path when you want to scan all documents and all folders from Shared Documents.
For example:http://sp2013/SharedDocuments - Specify Documents in the path when you want to scan all documents and all folders from a subfolder under Shared Documents.
For example:http://sp2013/Documents/SalesReports
or, specify only the FQDN of your SharePoint,
For examplehttp://sp2013to discover and scan all SharePoint sites and subsites under a specific URL and subtitles under this URL. - Grant scanner Site Collector Auditor rights to enable this.
- For the remaining settings on this pane, do not change them for this initial configuration, but keep them as Content scan job default. The default setting means that the data repository inherits the settings from the content scan job.
Use the following syntax when adding SharePoint paths:
Root path:http://<SharePoint server name>
Scans all sites, including any site collections allowed for the scanner user.
Requires additional permissions to automatically discover root content
Specific SharePoint subsite or collection:
One of the following:
–http://<SharePoint server name>/<subsite name>
–http://SharePoint server name>/<site collection name>/<site name>
Requires additional permissions to automatically discover site collection content
Specific SharePoint library:
One of the following:
–http://<SharePoint server name>/<library name>
–http://SharePoint server name>/.../<library name>
Specific SharePoint folder:http://<SharePoint server name>/.../<folder name>
- Specify Shared Documents in the path when you want to scan all documents and all folders from Shared Documents.
- On the Repositories pane, select Add:
- Repeat the previous steps to add as many repositories as needed.
- When you’re done, close both the Repositories and Content scan job panes.
Back on the Azure Information Protection – Content scan job pane, your content scan name is displayed, together with the SCHEDULE column showing Manual and the ENFORCE column is blank.
You’re now ready to install the scanner with the content scanner job that you’ve created. Continue with Scanner Installation.
Scanner Installation
Now that we have verified that all prerequisites and configured the AIP in Azure, we can go through the basic scanner install.
- Log onto the server where you will install the AIP Scanner service using an account that is a local administrator of the server and has permission to write to the SQL Server master database. (more restrictive scenarios are documented in the official documentation)
- Run AzInfoProtection_UL.exe on the server and step through the client install (this also drops the AIP Scanner bits).
WARNING: This blog is based on the current version of the AIP Client. If you want to update to the Preview client, please install the GA first and then install the preview client and use Update-AIPScanner after installation. - Next, open an Administrative PowerShell prompt.
- At the PowerShell prompt, type the following command and press Enter:
1 | Install-AIPScanner -SqlServerInstance "name" -Profile "cluster name" |

Create Cloud Service Account
If you are not using Azure AD Sync for your Service account, you will need to create a service account in the cloud tenant to use for AIP authentication. If you have synced your on premises service account, you can skip this task.
- Run the command below to connect to Azure AD.
1 | Connect-AzureAD |
- When prompted, provide tenant Global Admin credentials.
- To create an account in the cloud, you must first define a password profile object. Run the commands below to define this object.
1 2 3 4 5 6 7 8 9 | $PasswordProfile = New-Object -TypeName Microsoft.Open.AzureAD.Model.PasswordProfile $PasswordProfile.ForceChangePasswordNextLogin = $false $Password = Read-Host -assecurestring "Please enter password for cloud service account" $Password = [System.Runtime.InteropServices.Marshal]::PtrToStringAuto([System.Runtime.InteropServices.Marshal]::SecureStringToBSTR($Password)) $PasswordProfile.Password = $Password |
- When prompted, enter a password for the cloud service account.
- To create the account, run the commands below.
1 2 3 | $Tenant = Read-Host "Please enter tenant name for UserPrincipalName (e.g. contoso.com)" New-AzureADUser -AccountEnabled $True -DisplayName "AIP Scanner Cloud Service" -PasswordProfile $PasswordProfile -MailNickName "AIPScannerCloud" -UserPrincipalName "AIPScannerCloud@$Tenant" |
- When prompted, enter the tenant name you want to use for the UserPrincipalName for the cloud service account (e.g. tenant.onmicrosoft.com).
Creating the Azure AD Application in Azure
Next, we will configure the App Registration for the Web App that is required to run the Set-AIPAuthentication command that will be used to get the authentication token. We will also assign the necessary Oauth2Permissions for the Web App to have delegated rights to the App.
- Run the commands below to create the Web App, associated Service Principal, and key password.
1 2 3 4 5 6 7 8 9 10 11 | New-AzureADApplication -DisplayName AIPOnBehalfOf -ReplyUrls http://localhost $WebApp = Get-AzureADApplication -Filter "DisplayName eq 'AIPOnBehalfOf'" New-AzureADServicePrincipal -AppId $WebApp.AppId $WebAppKey = New-Guid $Date = Get-Date New-AzureADApplicationPasswordCredential -ObjectId $WebApp.ObjectID -startDate $Date -endDate $Date.AddYears(1) -Value $WebAppKey.Guid -CustomKeyIdentifier "AIPClient" |
- Next, we need to run some commands to build the RequiredResourceAccess object that is needed to automate delegation of permissions for the native application.
1 2 3 4 5 6 7 8 9 10 11 | $AIPServicePrincipal = Get-AzureADServicePrincipal -All $true | ? {$_.DisplayName -eq 'AIPOnBehalfOf'} $AIPPermissions = $AIPServicePrincipal | select -expand Oauth2Permissions $Scope = New-Object -TypeName "Microsoft.Open.AzureAD.Model.ResourceAccess" -ArgumentList $AIPPermissions.Id,"Scope" $Access = New-Object -TypeName "Microsoft.Open.AzureAD.Model.RequiredResourceAccess" $Access.ResourceAppId = $WebApp.AppId $Access.ResourceAccess = $Scope |
- Now we can create the App and associated Service Principal using the commands below.
1 2 3 4 5 | New-AzureADApplication -DisplayName AIPClient -ReplyURLs http://localhost -RequiredResourceAccess $Access -PublicClient $true $NativeApp = Get-AzureADApplication -Filter "DisplayName eq 'AIPClient'" New-AzureADServicePrincipal -AppId $NativeApp.AppId |
Authenticating as the AIP Scanner Service
In this task, we will use the command created previously to authenticate the AIP Scanner to the AIP Service.
- Open PowerShell using Run as a different user and use the on premises Scanner Service account which should have Run As Administrator rights.

- Run the commands in the following PowerShell session with the Run as Administrator option, which is required for the OnBehalfOf parameter.
- The first command creates a PSCredential object and stores the specified Windows user name and password in the $pscreds variable. When you run this command, you are prompted for the password for the user name that you specified.
- The second command acquires an access token that is combined with the application so that the token becomes valid for 1 year, 2 years, or never expires, according to your configuration of the registered app in Azure AD. The user name of scanner@contoso.com sets the user context to download labels and label policies from your labeling management center, such as the Office 365 Security & Compliance Center.
1 2 3 | $pscreds = Get-Credential DOMAIN\scanner Set-AIPAuthentication -AppId "Web App ID" -AppSecret "Password Generated from previous cmd" -DelegatedUser AIPScannerCloud@tenant.onmicrosoft.com -TenantId "Your M365 Tenant ID" -OnBehalfOf $pscreds |
Successful OUTPUT:
Acquired application access token on behalf of DOMAIN\scanner
- Last Step is to Restart the AIP Scanner Service
1 | Restart-Service AIPScanner |
Look to these reference documents for further details:
Set-AIPAuthentication
Get Azure AD Token for the AIP Scanner
Configure the scanner to apply classification and protection
The default settings configure the scanner to run once, and in reporting-only mode.
To change these settings, edit the content scan job:
- In the Azure portal, on the Azure Information Protection – Content scan jobs pane, select the cluster and content scan job to edit it.
- On the Content scan job pane, change the following, and then select Save:
- From the Content scan job section: Change the Schedule to Always
- From the Policy enforcement section: Change Enforce to On
Tip: You may want to change other settings on this pane, such as whether file attributes are changed and whether the scanner can relabel files. Use the information popup help to learn more information about each configuration setting.
- Make a note of the current time and start the scanner again from the Azure Information Protection – Content scan jobs pane:

Alternatively, run the following command in your PowerShell session:
1 | Start-AIPScan |
The scanner is now scheduled to run continuously. When the scanner works its way through all configured files, it automatically starts a new cycle so that any new and changed files are discovered.
MUCH MORE TO COME! CHECK OFTEN AND SEND COMMENTS!
REFERENCES:
AIP Prerequisites
Install and Configure AIP UL Application
AIP UL Client Download
AIP Classic Client Express Installation
Hi
Do you know if the detailed reports produced by the AIP scanner can be configured to also include the date a file was last accessed and the file size?
Many thanks
Not that I know of natively. I do not think the the Azure Log Analytics saves that information as far as file size. I would start my research here if you haven’t already:
https://techcommunity.microsoft.com/t5/security-compliance-and-identity/data-discovery-reporting-and-analytics-for-all-your-data-with/ba-p/253854
You can run the following in PowerShell once you get the file name or folder to find out that information:
Get-item C:\Users\Administrator\Documents\WindowsPowerShell\LDLNET.ps1 | fl LastWriteTimeYou can get the file size in MB this way if you know the file path:
$File = "{0:N2}" -f ( ( Get-ChildItem 'C:\Users\Administrator\Documents\WindowsPowerShell\Scripts\Get-ExchangeTracking.ps1' -Force | Measure-Object -Property Length -Sum ).Sum / 1MB ) ; Write-Host $File "MB" -ForegroundColor GreenIf you want the whole directory:
$Folder = "{0:N2}" -f ( ( Get-ChildItem 'C:\Users\Administrator.LDLNET\Documents\WindowsPowerShell\Scripts' -Recurse -Force | Measure-Object -Property Length -Sum ).Sum / 1MB ) ; Write-Host $Folder "MB" -ForegroundColor Green