I had a very interesting installation issue recently when installing Exchange 2019 into a new environment. We ran through all the Exchange Preparation for the root and child domains in the forest as described HERE. The results of those installation procedures showed SUCCESS, but when we started installing Exchange, we ran into issues with the System Mailboxes not being available to complete the Mailbox Role part of the installation. Most of the articles that I found said to re-run the Domain Prep (/preparealldomains) and the AD Prep (/pad). So we did, and managed to get the first server installed somehow.
The reason I said somehow is because when we tried to logon to the EAC, we would get a 400 Bad Request Error and could not logon to the console. Next, we tried PowerShell and was able to load PowerShell, but I noticed that only ~100 cmdlets loaded. I thought that maybe we had to re-create the account mailbox to get it working properly. Problem was, one of the cmdlets that would not load was Disable-Mailbox along with others like Enable-Mailbox and New-Mailbox. It was as if the admin account we were using had no rights to administer Exchange in any way.
Next, we opened the mailbox in OWA. The mailbox came up okay, so I told the admin to change the URL to /ecp to try and get into the admin center. What happened was that the normal user control panel opened instead, showing again that the account did not have permissions.
We checked replication to the child domain and made sure there were not any apparent AD issues present. There were none. I next started reviewing how Exchange uses RBAC (Role Based Access Control) Groups and Role Assignments to grant users access to Exchange Admin Functionality. I read the following article located HERE.
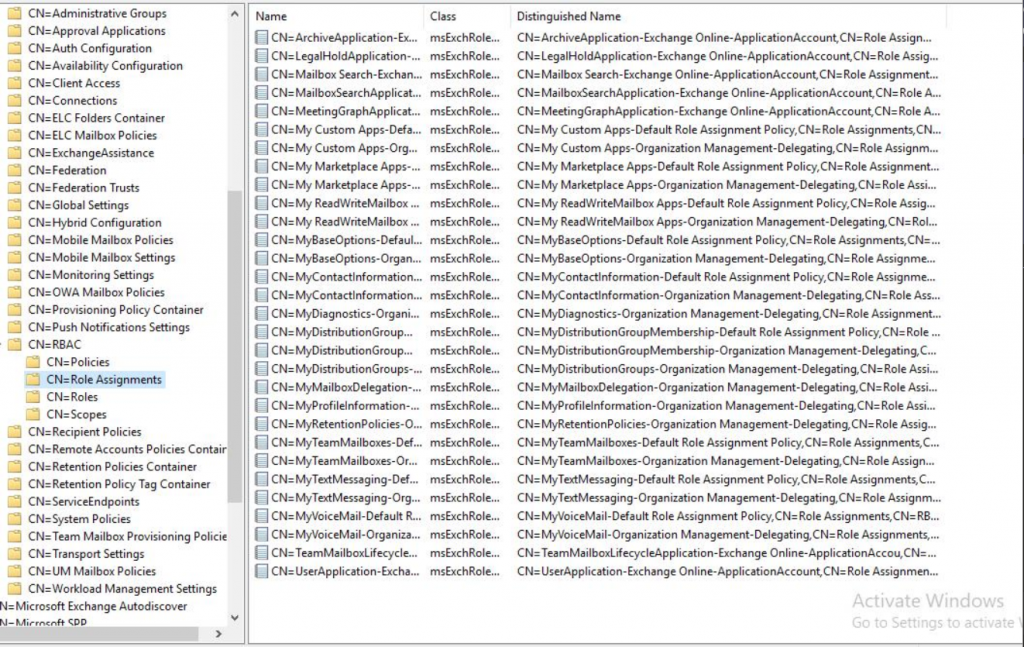
Something told me to go and check the Schema again, so I went to ADSIEdit > Configuration Container > Services > Microsoft Exchange > (Organization Name) > RBAC > Role Assignments
I looked at the list of role assignments in the window as follows:

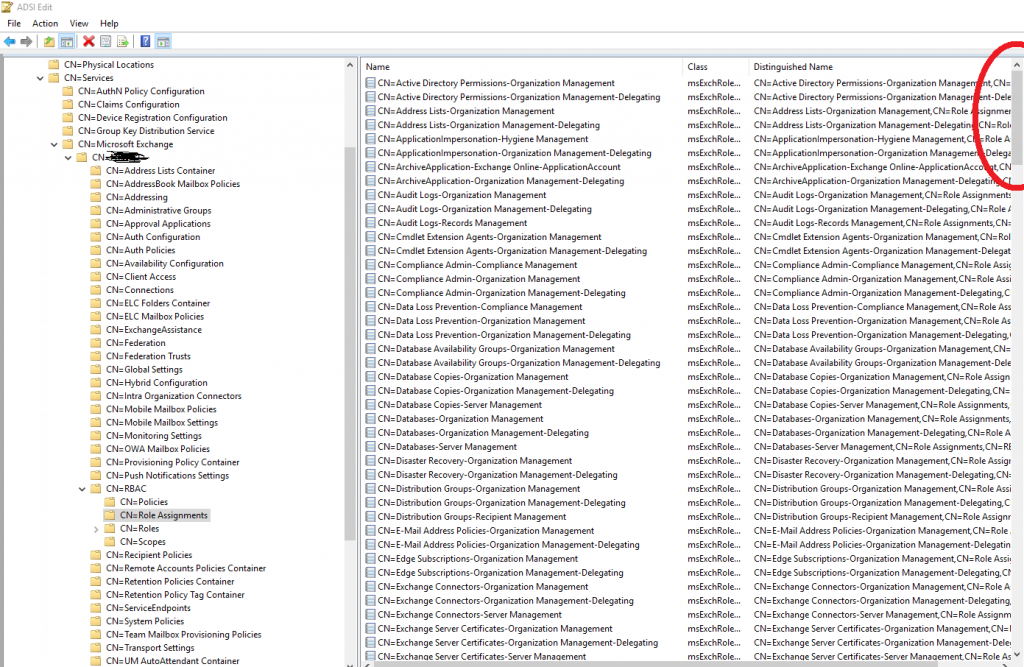
From the picture, you can see that the list is small, which in my experience is not correct. I verified this by going into my own 2019 environment and comparing the number of objects in that folder:

If you notice the list is MUCH longer and has many more objects listed in the container. So, how did Exchange Setup miss this during preparation? That I will find out later, but first I have to remediate this problem.
CAUSE:
If the RBAC roles assignments are not installed to allow an account to have administrative privileges in Exchange, then you cannot administrate Exchange to even make the necessary changes! Especially so if you’ve only installed ONE server in the environment!
REMEDIATION:
Manually repair the installation by running the script that creates these Objects in the Schema during setup.
******DISCLAIMER: Running the following commands in these instructions, running ADSIEdit, and/or making changes to your Schema and Exchange Installation outside the normal setup process is NOT recommended! Microsoft, LDLNET LLC, nor I (Lance Lingerfelt) are responsible for any issues or errors that may arise from using these instructions, period!******
That said, preform the following to regenerate the objects in the Schema:
1) Open Windows PowerShell (not the Exchange Management Shell) on the server that you installed Exchange Server on with the same account you used to install Exchange.
a. If you have UAC enabled, right click Windows PowerShell and click Run as administrator.
2) Run Start-Transcript c:\RBAC.txt and press Enter
a. This will start logging all commands and output you type to a text file.
3) Run Add-PSSnapin *setup and press Enter
a. This adds the setup snap-in which contains the setup cmdlets used by Exchange during install. You may see errors about loading a format data file. You can ignore those errors.
NOTE: DO NOT run any other cmdlets in this snap-in. Doing so could irreparably damage your Exchange installation.
4) Run Install-CannedRbacRoleAssignments -InvocationMode Install -Verbose and press Enter.
a. This cmdlet should create the required role assignments between the role groups and roles that should have been created during setup.
b. Be sure you run with the Verbose switch so we can capture what the cmdlet does.
5) Run Remove-PSSnapin *setup and press Enter
6) Run $Session = New-PSSession -ConfigurationName Microsoft.Exchange -ConnectionUri http://servername/PowerShell/ -Authentication Kerberos and press Enter
a. Be sure to replace SERVERNAME with the FQDN of your server.
7) Run Import-PSSession $Session and press Enter
a. You should notice that the normal number of cmdlets load (~700)
8) Run Get-ManagementRoleAssignment and press Enter. If you are able to run the cmdlet, then the remedation worked.
9) Run Stop-Transcript and press Enter
The final check is to return to ADSIEdit and check the container and see if all the objects are there. We also were now able to get into EAC as well as saw that the Arbitration mailboxes were populating along with the Health Mailboxes as needed per the installation.
It was very neat to see how running the Add-PSSnapIn cmdlet opened all the scripts from the Exchange Setup and allowed me to manually fix the installation problem by running the cmdlet script that need to perform that task that setup missed or refused to run.
POST MORTEM REVIEW
I am going to look over the installation logs and see where the installation failed and try to find out why it did not run on the subsequent re-installations of the AD Prep and Domain Prep. I will post those finding in this article when I have that available.
Thanks again to my Microsoft and Trimax teammates for your assistance with this. It has helped the customer in more ways than one!

Awesome post! Took awhile to find it until I realized I didn’t have these records, but once I started searching RBAC, this came right up and worked perfectly
Thanks!