
I’ve been currently assisting with onboarding at my new Full Time Contractor position at Microsoft. All of the new FTCs received laptops and needed to have the newest build of Windows 10 installed. The issue was that all of our laptops came with Windows 10 Professional and we needed to upgrade them to Enterprise edition.
After finding a working key for Enterprise Edition, we were still having issues joining the MS Azure domain so that we could get all of the needed software properly to being onboarding with Microsoft.
So, after going through a couple of re-images of my laptop with some failures attached to that, I finally was able to get the process down so that time would not be waisted for the oncoming new hires once they received their laptop. The issue was getting the correct build of Windows 10 and getting the proper apps installed in an efficient manner. Since the onboarding process was quickly moving, I needed to find a way to help streamline the process so the others would not have to go through all the mess I went through to get everything setup.
So, I began looking for a way to create a customized ISO for the build that would already have apps, settings, and customizations installed. I found this great article that details the process. I wanted to re-post this article here showing the steps I took to create the customized image by creating a VM in Hyper-V and then converting that completed image to an ISO that could be downloaded and utilized for the installation.
Creating a customized ISO image with pre-installed software and no user accounts
- A generalized ISO image without any pre-set user accounts, with pre-installed software, desktop, File Explorer and Start customizations will be created.
- All customizations and personalization will automatically be applied to all new user accounts
- Clean install will perform a normal OOBE, asking for regional settings, initial user and so on
- This ISO will be generalized meaning it is hardware independent and can be used to install Windows on any computer capable of running Windows 10, regardless if the machine is a legacy BIOS machine with MBR partitioning, or a UEFI machine with GPT partitioning
- The ISO image will be bootable on both BIOS / MBR and UEFI / GPT systems
NOTE: This post will show how to use a virtual machine to create the ISO. All virtual machine references and instructions in this tutorial apply to Hyper-V, available in Windows 10 PRO, Education and Enterprise editions. Oracle VirtualBox and VMware users might need to consult their preferred virtualization platform’s documentation if instructions can’t be used as is.
Everything in this instruction can be made in each edition of Windows 10 (in Home and Single Language editions using a third party virtualization platform) with native Windows tools and programs, apart from Windows Deployment and Imaging Tools, part of Windows 10 Assessment and Deployment Kit (ADK) needed later in the post. The ADK is a free native Microsoft tool, downloadable directly from Microsoft.
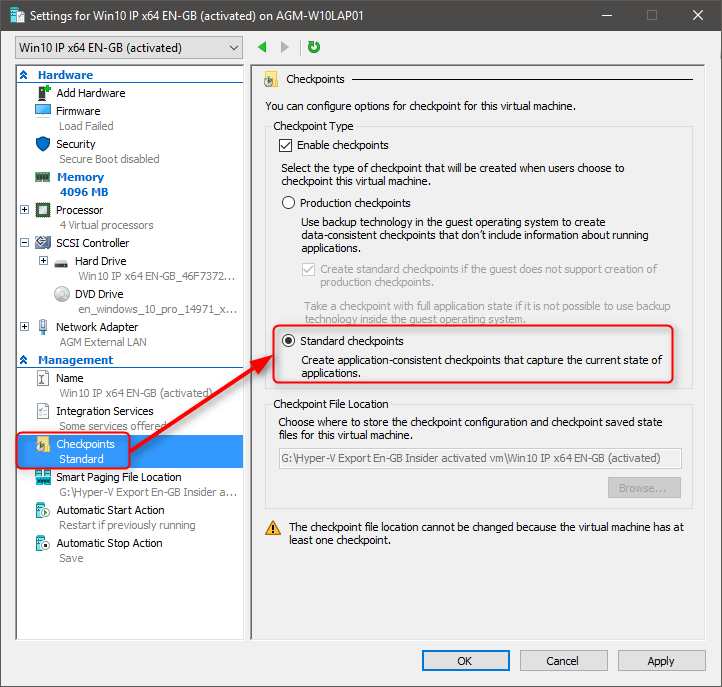
If you will do this on a Hyper-V virtual machine (which is the recommended method), make sure to set the new virtual machine to use Standard Checkpoints instead of default Production Checkpoints. You can do this in virtual machine’s settings:
Virtual machine generation is irrelevant, you can use Generation 1 or 2 as you wish
This method will produce an ISO image which can be compared to any original Windows 10 ISO you download from Microsoft, apart from the fact that it already contains pre-installed software according to your choice. It will also contain a customized and personalized default user profile, the base Windows uses whenever a new user profile will be created.
A customized default user profile means that whenever a new user account is created, all customizations (Start tiles, File Explorer & desktop icon and view settings, colors, wallpaper, theme, screensaver and so on will be applied to new user profile instead of Windows defaults.
Installation using this ISO will take somewhat longer than using a standard ISO because it not only contains full Windows setup, but also the pre-installed software. Notice that depending on how much space pre-installed software takes, you might not be able to burn this ISO to a standard 4.7 GB DVD disk but have to use a dual layer disk or a USB flash drive instead. My customized image came out to be about 8.5 GB in size.
The ISO created will include no user profile folders, personal user data and files.
This ISO image can be used on any hardware setup capable of running Windows and can be shared, subject to people you share the ISO with have valid licenses and / or activation keys for both Windows 10 and pre-installed software.
System Preparation Procedure
- Download the Windows ISO Installation tool from Microsoft
- Use this TOOL to download the ISO and create the installation media
- Install Windows 10 on your VM using the downloaded ISO
NOTE: The normal Windows Download from the link above will download Windows 10 Professional. You will need a key for the installation to upgrade to Enterprise Edition and you will need to be able to activate the copy of Windows to be able to save the customizations you create for your ISO.
- Boot into Windows 10 and do the following:
- Activate the Windows Edition your are installing with your key. You will require internet connectivity. I needed Enterprise Edition so I changed the Product Key In Settings to upgrade it from Professional.
- Install your preferred software, customize and personalize Windows, remove / add Start tiles as you wish, and set your preferred group policies (group policies not available in Home and Single Language editions). Do not run any program you install!
- Update all software and run Windows Update to get all the latest updates for the image.
- Notice that software installed now will be included in ISO install media, and will be pre-installed for all users on each computer you install Windows to using this custom ISO.
NOTE: If Windows on your reference machine is not activated, you cannot personalize it. In this case you need to modify Windows theme (wallpaper, screensaver, colors, sounds) as you wish on another, activated Windows 10 machine, save the theme as a theme file, copy it to inactivated reference machine and apply (double click).
Also notice that Edge as well as other UWP apps do not work when signed in to built-in admin account. If you need a browser to download software you have to use a third party browser or Internet Explorer. IE can be started from Run dialog by typing iexplore and clicking OK.
- Open an elevated command prompt and enter the following:
1 | %windir%\system32\sysprep\sysprep.exe /audit /reboot |
Windows will now restart in Audit Mode using built-in administrator account. You will see a Sysprep prompt in the middle of display:

Leave it open for now
- Open Notepad, paste the following code to it, make the necessary changes to customize the installation, and save it as
File name: unattend.xml (exactly this name!)
Save as type: All files (important!)
Save in folder: C:\Windows\System32\Sysprep
1 2 3 4 5 6 7 8 9 10 11 12 13 14 15 16 17 18 19 | <?xml version="1.0" encoding="utf-8"?> <unattend xmlns="urn:schemas-microsoft-com:unattend"> <settings pass="specialize"> <component name="Microsoft-Windows-Shell-Setup" processorArchitecture="amd64" publicKeyToken="31bf3856ad364e35" language="neutral" versionScope="nonSxS" xmlns:wcm="http://schemas.microsoft.com/WMIConfig/2002/State" xmlns:xsi="http://www.w3.org/2001/XMLSchema-instance"> <CopyProfile>true</CopyProfile> </component> <component name="Microsoft-Windows-Setup" processorArchitecture="amd64" publicKeyToken="31bf3856ad364e35" language="neutral" versionScope="nonSxS" xmlns:wcm="http://schemas.microsoft.com/WMIConfig/2002/State" xmlns:xsi="http://www.w3.org/2001/XMLSchema-instance"> <UserData> <AcceptEula>true</AcceptEula> <FullName>Your Full Name</FullName> <Organization>Your Organization Name</Organization> <ProductKey> <Key>Your 25 Digit Product Key in format XXXXX-XXXXX-XXXXX-XXXXX-XXXXX</Key> <WillShowUI>Never</WillShowUI> </ProductKey> </UserData> </component> </settings> </unattend> |
- When Sysprepping with the Generalize switch, which we will soon do, the component CopyProfile being set to be TRUE in answer file has a small issue or rather a small inconvenience: it leaves the last used user folders and recent files of built-in admin to end user’s Quick Access in File Explorer.
- To fix this, we need to reset Quick Access to default whenever a new user signs in first time. It requires the need to run a small batch file at first logon of new user, and then remove the batch file itself from user’s %appdata% so Quick Access will not be reset on any subsequent logon.
- To do this, open an elevated (Run as administrator) Notepad (Notepad must be elevated to save in system folders), paste the following code to it, save it as:
File name: RunOnce.bat (or any name you prefer, with extension .bat)
Save as type: All files (important!)
Save File in folder: %appdata%\Microsoft\Windows\Start Menu\Programs\Startup
1 2 | echo Y | del %appdata%\microsoft\windows\recent\automaticdestinations\* del %0 |
- Delete all existing user accounts and their user profile data (Option One in this tutorial)
- You are currently signed in using Windows built-in administrator account. In File Explorer, open C:\Users\Administrator folder and check that all user folders are empty deleting all possibly found content
- Run Disk Clean-up, selecting and removing everything possible (tutorial)
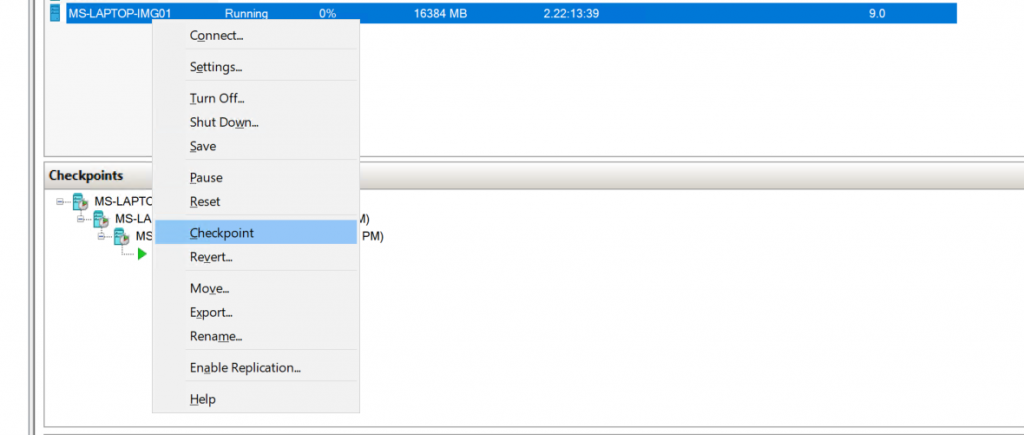
- When the disk has been cleaned, create a checkpoint of the VM from Hyper-V Manager. Right Click VM > Click Checkpoint
- In Sysprep dialog still open on your desktop, select System Cleanup Action: Enter System Out-of-Box Experience (OOBE), select Shutdown Options: Shutdown, select (tick the box) Generalize, click OK:
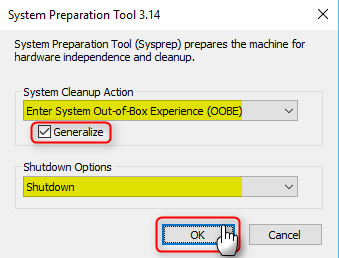
Sysprep will now prepare Windows, shutting down machine when done. LEAVE THE VM OFF AND DO NOT RESTART IT! Now, we continue to the Image Creation section.
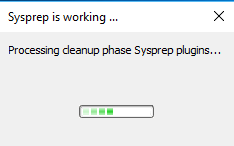
Image Creation Procedure
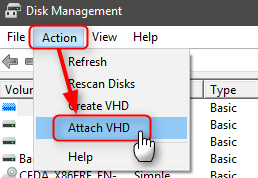
- On your Hyper-V Host machine, open Disk Management
- Select Attach VHD from Action menu:
- Browse to and select your reference virtual machine’s VHD / VHDX file. If you have any checkpoints (AVHD / AVHDX files) created on this vm, select the one with most recent time stamp. Note that you have to select show all files to be able to see checkpoint AVHD / AVHDX files:

- Select the check box labeled Read-only (this is very important!), then click OK:
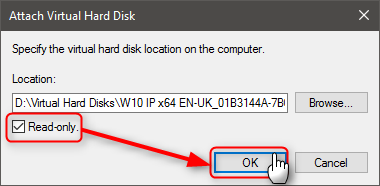
IMPORTANT: Forgetting to select Read-only will especially when mounting a checkpoint AVHD / AVHDX file make it unusable for Hyper-V! You will NOT be able to boot your VM and could corrupt it should you have write access on the mounted VHDX file.
Windows mounts the virtual hard disk, and all of its partitions, as separate disk. In case of an MBR disk it even mounts the system reserved partition.

NOTE: In the above picture the Windows system partition for the reference VM is drive K:
- Open the Windows system partition VHD to be sure that’s the one where Windows is installed, note the drive letter your host assigned to it.
- Open an elevated Command Prompt, enter the following command to create a new install.wim file:
1 | dism /capture-image /imagefile:D:\install.wim /capturedir:K:\ /name:"AnyName" /compress:maximum /checkintegrity /verify /bootable |
NOTE: D:\install.wim path in this case is the drive and directory where you want to save the image file. K:\ path is the capture path with subfolders of the drive you want to image FROM

NOTE: The name given in /name switch in above command is irrelevant as we will name the ISO later on, but is needed for the command to run. Use any name you want to for the switch parameter.
The image process will take time, go get something to eat as I did. On my high end Hyper-V server this takes over 20 minutes, the first half of it without showing any progress indicator whatsoever. DISM works somewhat faster if you don’t use optional switches /checkintegrity and /verify but it is not recommended that you to create install.wim without checking its integrity and verifying it.
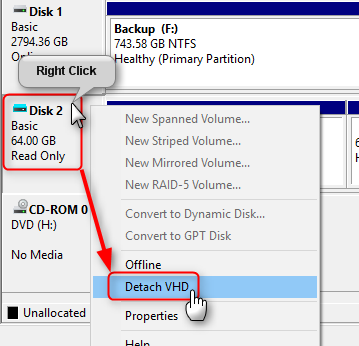
- When completed capturing the image, detach the VHD / VHDX or AVHD / AVHDX file from host by right clicking it in Disk Management and selecting Detach VHD:
ISO Image Creation Procedure
- Mount the original Windows 10 ISO you downloaded in the first step to a Virtuial Drive on your Hyper-V Server Host.
- Copy its contents (everything) to a folder you create on one of your Hyper-V host’s hard disks:

I named the folder ISO_Files and placed it on the D: drive where I had created the image from the previous section. Alternatively, you can copy the contents of a created Windows 10 install USB or DVD to the ISO_Files folder.
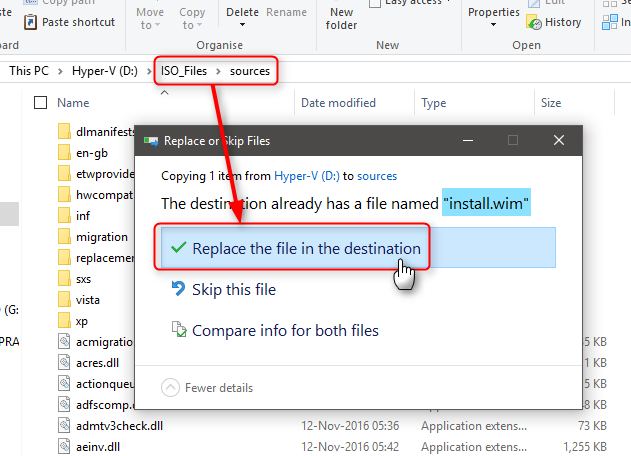
- Browse to your custom install.wim created earlier in previous section. Copy it to Sources folder under the ISO_Files folder, replacing the original install.wim in that directory:

IMPORTANT: If the ISO you used when copying the files to the ISO_Files folder has been made with Windows Media Creation Tool, the ISO_Files\Sources folder contains an install.esd file instead of install.wim.
In this case you will naturally not get “File exists” prompt. Simply delete the install.esd file and paste your custom install.wim to replace it. This will help reduce the overall size of the ISO and not confuse the installation process when ran.
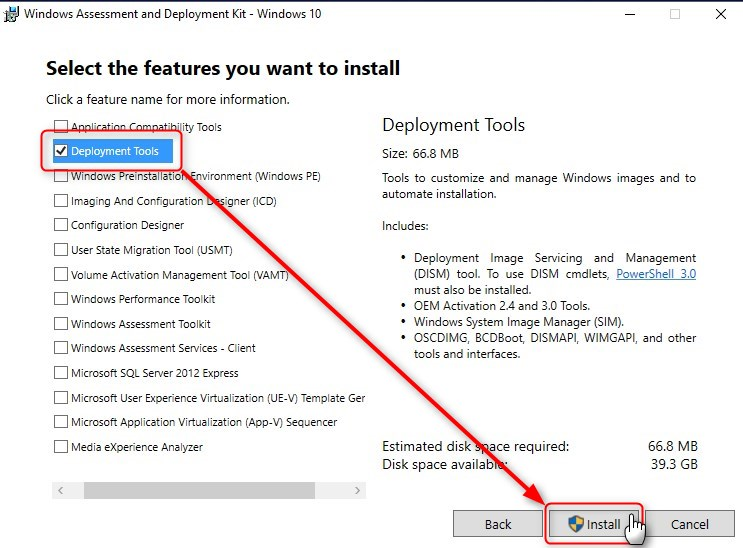
- Now, we download the latest Windows Assessment and Deployment Kit(ADK)for Windows 10: Windows ADK downloads – Windows Hardware Dev Center
The full download for the ADK is about 7.5 GB but luckily we only need the Deployment Tools portion. So, unselect everything else except Deployment Tools and click Install:
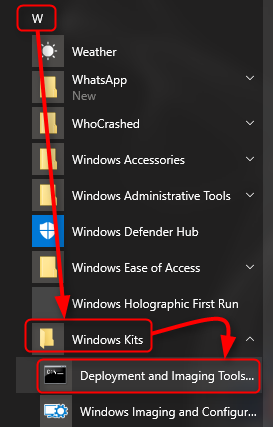
- Once completed, you should have a folder within your start menu for the ADK Tools Installation under the folder Windows Kits. Start the Deployment and Imaging Tools interface program by Running the Program as an Administrator:
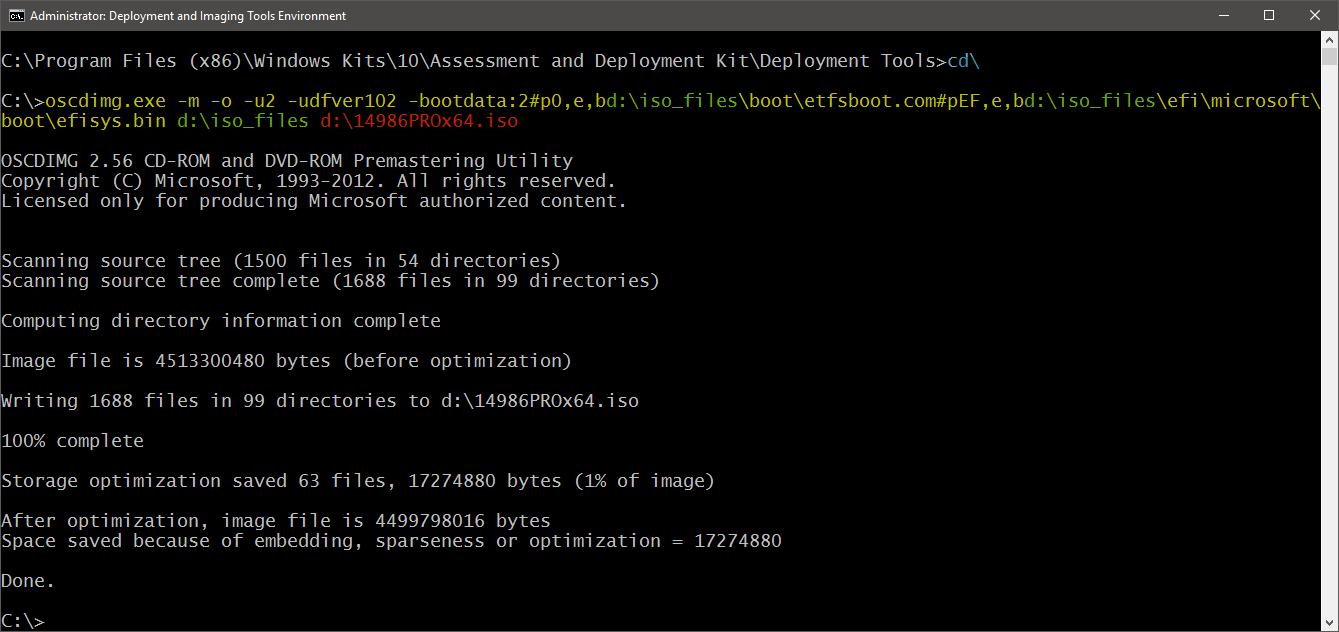
- At the command prompt, type cd\ to bring your prompt to the root of the folder path you are on.
- Type the following command to initiate creation of the ISO image file:
1 | oscdimg.exe -m -o -u2 -udfver102 -bootdata:2#p0,e,bd:\iso_files\boot\etfsboot.com#pEF,e,bd:\iso_files\efi\microsoft\boot\efisys.bin d:\iso_files d:\14986PROx64.iso |
Replace three instances of d:\iso_files with the path to the ISO_Files folder where you copied Windows installation files. Notice that this is not a typo: first two of these instances are typed as argument for switch -b without a space in between the switch and argument. This is to tell the oscdimg command where to find boot files to be added to ISO.
Replace d:\14986PROx64.iso with the path where you want to store the ISO image. This is where you also name the ISO file what you want the file name to be.
Although the command seems a bit complicated, everything in it is needed. For more information about the oscdimg command line options, see: Oscdimg Command-Line Options
You now have a completed ISO image ready for distribution to your machines. The overall process took me about 4 hours to complete with all the customizations that I did. Thanks again to Ten Forums for the article. I have provided references below for your convenience as well.
HAPPY IMAGING!!
PLEASE COMMENT!!
REFERNCES:
Create Windows 10 ISO image from Existing Installation
Open and Use Disk Cleanup in Windows 10
Download Windows 10
Windows 10 sysprep – how to skip entering product key
Windows ADK downloads – Windows Hardware Dev Center
getting “windows could not display the images available for installation” error when trying to deploy image.
w10 1809 pro x64
tried looking for PID.txt but it was not in the boot.wim or install.wim
Same here
Hi Mam/Sir,
Good day! I finished making a customized image. When I tried, this is the error “Windows could not display the images available for installation”.
Please help me.
Thank you.
Little confused by the early part of the setup where you advise to go onto windows and setup everything including start tiles etc. When you first logon you have to create a local account (if you by pass connecting to Wifi). Surely later, when you delete all local accounts, you will trash that work, having to repeat it as administrator in Audit mode or am I missing something?
Would appreciate any advice.
When syspreping the image with the generalize parameter, you’ll want to use the COPYPROFILE switch in the answer file to set the profile to use for the new users. I usually do not have more than ONE account listed in the profiles when setting up an image. Doing just one account will NOT stop the customization and generalize the settings for any user account you create when you reboot:
A customized default user profile means that whenever a new user account is created, all customizations (Start tiles, File Explorer & desktop icon and view settings, colors, wallpaper, theme, screensaver and so on will be applied to new user profile instead of Windows defaults.
NOTE: This article is a little old so check the References at the end of the article to go to other webpages that might have more information for you. I hope this helps!
Mate, you are a life saver. Honestly, I had spent hours looking for all of this information, often lead down the wrong path or steps missing. this is THE BEST, most succinct and helpful guide I’ve seen. Thank you for your help!
When I try the command to create the .wim file I get the following error. any ideas?
C:\WINDOWS\system32>dism /capture-image /imagefile:C:\install.wim /capturedir:D:\ /name:”Private” /compress:maximum /checkintegrity /verify /bootable
Deployment Image Servicing and Management tool
Version: 10.0.19041.844
Error: 1805
The environment specified is invalid.
The DISM log file can be found at C:\WINDOWS\Logs\DISM\dism.log
After the system reboots and goes to “Getting Ready” I receive this message.
“windows could not parse or process unattend answer file [C:\Windows\system32\sysprep\unattend.xml] for pass [specialize]. The answer file is invalid”
Any suggestions?
Hi,
Thanks a lot for this detailed tutorial. I tried it today and I have noted two points:
1) If you have password local policies on the machine where you run sysrep, you may get an error at the reboot phase (after %windir%\system32\sysprep\sysprep.exe /audit /reboot) if your minimum password length is different than 0 and password complexity is enabled. You need to remove both entries in order to complete the process. See here: https://www.urtech.ca/2015/12/solved-windows-could-not-complete-the-installation-windows-10-sysprep/
2) I made a custom image of Windows 10 21H1 Enterprise. With this version, the unattend.xml given here didn’t work. I need to use instead of and instead of
Hope it can help!