
Yesterday, I posted on how Exchange now uses the Resilient File System (ReFS) to optimize and protect Exchange critical files. Another layer of protection is using a database availability group (DAG) for redundancy and is a necessary factor when designing an Exchange Enterprise Environment.
In this example, I will walk you through the installation of an Exchange Server 2019 DAG as I configured in my environment. This DAG will contain two Exchange Servers in the same site with a third Windows Server 2019 server being the File Share Witness (FSW).
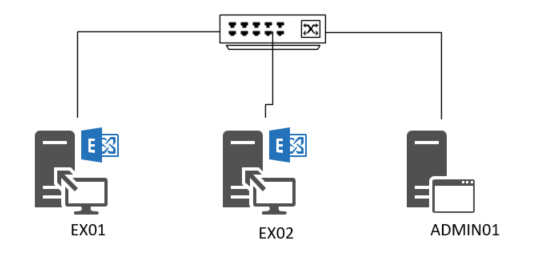
For my configuration, I configured two identical Windows Server 2019 VMs (same procs, RAM, vhdx drives, partitions, etc…). I configured the Exchange Data Volume using ReFS and mounted them to the same folder on the C: Drive on each server. This is very important for replication to take place successfully when the databases are added to the DAG.
1 2 3 4 5 6 7 8 9 10 11 12 13 | Get-MailboxDatabase | fl Name,EDBFilePath,LogFolderPath Name : EX01-DB01 EdbFilePath : C:\Exchange\Data-ReFS\DB\EX01-DB01\EX01-DB01.edb LogFolderPath : C:\Exchange\Data-ReFS\Logs\EX01-DB01 Name : EX01-ARCHIVE-DB EdbFilePath : C:\Exchange\Data-ReFS\DB\EX01-ARCHIVE-DB\EX01-ARCHIVE-DB.edb LogFolderPath : C:\Exchange\Data-ReFS\Logs\EX01-ARCHIVE-DB Name : EX02-DB01 EdbFilePath : C:\Exchange\Data-ReFS\DB\EX02-DB01\EX02-DB01.edb LogFolderPath : C:\Exchange\Data-ReFS\Logs\EX02-DB01 |
I next went to the Admin server where the FSW would be hosted and added the Exchange Trusted Subsystem Account to the local Administrators group on that server:
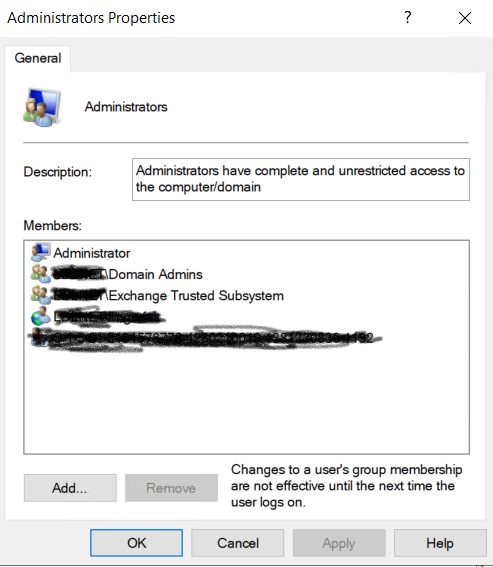
Add the Exchange Trusted Subsystem Account to the Local Administrators Group on the FSW.
NOTE: The reason that this is an ‘IP-less’ DAG is that I’m creating a DAG with no cluster administrative access point (CAAP). The DAG has no IP address of its own, and no computer object in Active Directory. The main implication of this is that backup software that relies on the CAAP or backup operations won’t work. This option of an ‘IP-less’ DAG was first introduced in Exchange Server 2013 SP1/CU4, so by now any decent backup products should support this configuration. But you should always verify this with your backup vendor of choice. Also be aware that this is only supported for DAGs that are running on Windows Server 2012 R2 (or later).
Next, we create the DAG from Exchange PowerShell using the New-DatabaseAvailabilityGroup cmdlet. Now remember that since you are using the ReFS system for your database volumes, you will need to specify the -FileSystem parameter within the cmdlet to assure proper setup and replication of the data files.
1 2 3 4 5 | New-DatabaseAvailabilityGroup -Name LDLNETDAG01 -WitnessServer admin01.ldlnet.org -FileSystem ReFS Name Member Servers Operational Servers ---- -------------- ------------------- LDLNETDAG01 {} |
Next, we add the Exchange Servers that hold the databases that will be replicated within the DAG:
1 | Add-DatabaseAvailabilityGroupServer -Identity LDLNETDAG01 -MailboxServer EX01 |
1 | Add-DatabaseAvailabilityGroupServer -Identity LDLNETDAG01 -MailboxServer EX02 |
The DAG will now show the two servers as Operational Member Servers:
1 2 3 4 5 | Get-DatabaseAvailabilityGroup -Status | ft -a -wr Name Member Servers Operational Servers ---- -------------- ------------------- LDLNETDAG01 {EX01, EX02} {EX01, EX02} |
The FSW Directory was created on the admin01 server when the DAG was created. We can verify that with the following cmdlet:
1 2 3 4 5 6 7 8 9 | Get-DatabaseAvailabilityGroup -Status | fl *Witness* WitnessServer : admin01.ldlnet.org WitnessDirectory : C:\DAGFileShareWitnesses\LDLNETDAG01.ldlnet.org AlternateWitnessServer : AlternateWitnessDirectory : WitnessShareInUse : Primary DxStoreWitnessServers : |
Next, we add the databases that we want replicated to the DAG as replicated databases. I want all my Databases on EX01 to replicate to EX02 and vice versa for the EX02 Databases. I want the activation preference to remain on the server that the databases were originally created on so I will use the -ActivationPreference parameter to accomplish that. I will go into more detail on Activation Preference in another post.
1 | Add-MailboxDatabaseCopy -Identity EX01-DB01 -MailboxServer EX02 -ActivationPreference 2 |
1 | Add-MailboxDatabaseCopy -Identity EX01-ARCHIVE-DB -MailboxServer EX02 -ActivationPreference 2 |
1 | Add-MailboxDatabaseCopy -Identity EX02-DB01 -MailboxServer EX01 -ActivationPreference 2 |
Now we verify that the Database Copies are healthy on each replication member using the Get-MailboxDatabaseCopyStatus cmdlet. You will see a Healthy Status on the replicated copies:
1 2 3 4 5 6 7 | Get-MailboxDatabaseCopyStatus -Server EX01 | ft -a -wr Name Status CopyQueueLength ReplayQueueLength LastInspectedLogTime ContentIndexState ---- ------ --------------- ----------------- -------------------- ----------------- EX01-DB01\EX01 Mounted 0 0 NotApplicable EX01-ARCHIVE-DB\EX01 Mounted 0 0 NotApplicable EX02-DB01\EX01 Healthy 0 0 6/12/2019 11:03:03 AM NotApplicable |
1 2 3 4 5 6 7 | Get-MailboxDatabaseCopyStatus -Server EX02 | ft -a -wr Name Status CopyQueueLength ReplayQueueLength LastInspectedLogTime ContentIndexState ---- ------ --------------- ----------------- -------------------- ----------------- EX02-DB01\EX02 Mounted 0 0 NotApplicable EX01-ARCHIVE-DB\EX02 Healthy 0 0 6/12/2019 11:06:44 AM NotApplicable EX01-DB01\EX02 Healthy 0 0 6/12/2019 10:46:40 AM NotApplicable |
POSITIVE ENERGY!
KILL NARCISSISM!
HAPPY TROUBLESHOOTING!
REFERENCES:
Installing an Exchange Server 2016 Database Availability Group