
For most companies today, we want to make access to OWA easy for the users. Most folks will just type in mail.domain.com/owa or something of the like to get to the OWA page. If you don’t use HTTPS by default though, you will not be able to access OWA and will get an error on the page. We need to be able to redirect the HTTP query to go to SSL or HTTPS so that you get the proper logon page and have the access secured by SSL PKI as per the security standard.
Now, most bigger companies will install a load balancer that will program the redirection to HTTPS when the request is made before it hits the Exchange Server. But, for small companies, like mine, that cannot afford a load balancer, we need a native way in Windows and Exchange to be able to perform the same task and have it redirect to HTTPS so that your users are not confused when typing in the address.
The following shows how to configure IIS so that it natively redirects all HTTP requests for OWA to HTTPS.
By default in Exchange Server, the URL https://<ServerName> redirects users to https://<ServerName>/owa. But, if anyone tries to access Outlook on the web (formerly known as Outlook Web App) by using http://<ServerName> or http://<ServerName>/owa, they’ll get an error.
You can configure http redirection for Outlook on the web so that requests for http://<ServerName> or http://<ServerName>/owa are automatically redirected to https://<ServerName>/owa. This requires the following configuration steps in Internet Information Services (IIS):
- Remove the Require SSL setting from the default website.
- Restore the Require SSL setting on other virtual directories in the default website that had it enabled by default (except for /owa).
- Configure the default website to redirect http requests to the /owa virtual directory.
- Remove http redirection from all virtual directories in the default website (including /owa).
- Reset IIS for the changes to take effect.
Step 1: Use IIS Manager to remove the Require SSL setting from the default website
- Open IIS Manager on the Exchange server. An easy way to do this in Windows Server 2012 or later is to press Windows key + Q, type inetmgr, and select Internet Information Services (IIS) Manager in the results.
- Expand the server, and expand Sites.
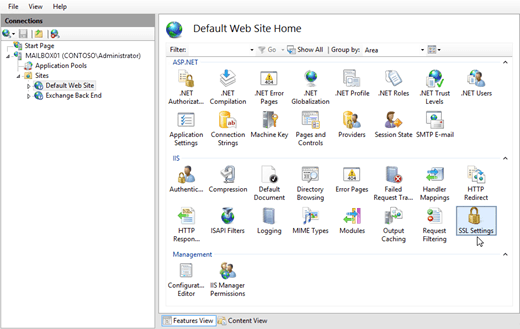
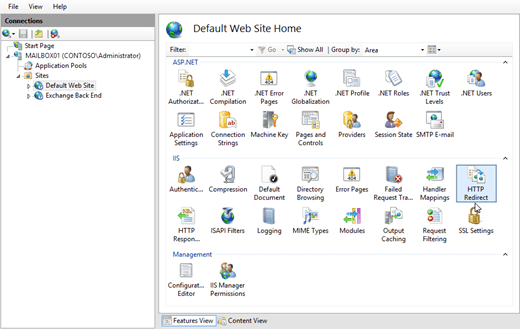
- Select Default Web Site. and verify Features View is selected at the bottom of the page.
- In the IIS section, double-click SSL Settings.
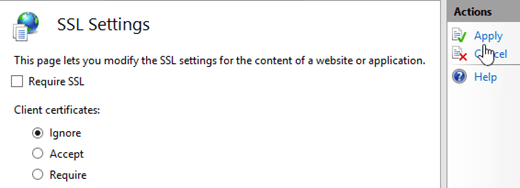
- On the SSL Settings page, clear the Require SSL check box, and in the Actions pane, click Apply.
Note: To perform this procedure on the command line, open an elevated command prompt on the Exchange server (a Command Prompt window you open by selecting Run as administrator) and run the following command:
1 | %windir%\system32\inetsrv\appcmd.exe set config "Default Web Site" -section:access -sslFlags:None -commit:APPHOST |
Step 2: Use IIS Manager to restore the Require SSL setting on other virtual directories in the default website
When you change the Require SSL setting on a website in IIS, the setting is automatically inherited by all virtual directories in the website. Because we’re only interested in configuring Outlook on the web, you need to restore the Require SSL setting for other virtual directories that had it enabled by default.
Based on the information in the Default Require SSL and HTTP Redirect settings in the default website on an Exchange server section, use the following procedure to restore the setting on the other virtual directories where Require SSL was enabled by default:
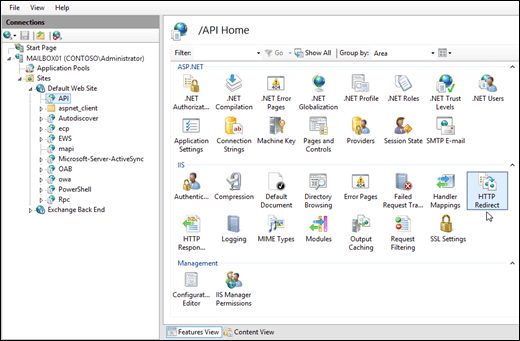
- In IIS Manager, expand the server, expand Sites, and expand Default Web Site.
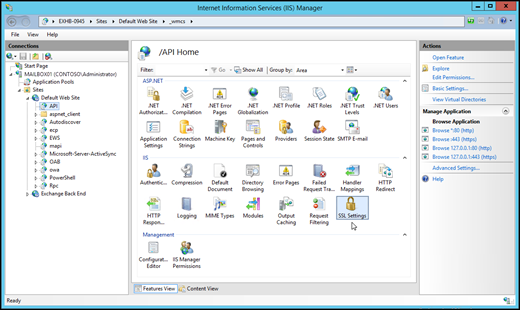
- Select the virtual directory, and verify Features View is selected at the bottom of the page.
- In the IIS section, double-click SSL Settings.
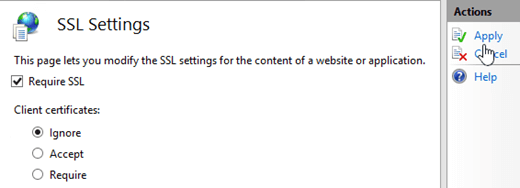
- On the SSL Settings page, select the Require SSL check box, and in the Actions pane, click Apply.
- Repeat the previous steps on each virtual directory in the default website that had Require SSL enabled by default ***(except for /owa)***. The only virtual directories that don’t have Require SSL enabled by default are /PowerShell and /Rpc.
NOTE: PLEASE REMEMBER TO NOT CHECK THE “Require SSL” FOR THE /OWA DIRECTORY. THIS WILL CAUSE A 403 Access Denied ERROR WHEN TRYING TO REDIRECT.
Note: To perform these procedures on the command line, replace <VirtualDirectory> with the name of the virtual directory, and run the following command in an elevated command prompt:
1 | %windir%\system32\inetsrv\appcmd.exe set config "Default Web Site/<VirtualDirectory>" -section:Access -sslFlags:Ssl,Ssl128 -commit:APPHOST |
Step 3: Use IIS Manager to configure the default website to redirect to the /owa virtual directory.
- In IIS Manager, expand the server, and expand Sites.
- Select Default Web Site. and verify Features View is selected at the bottom of the page.
- In the IIS section, double-click HTTP Redirect.
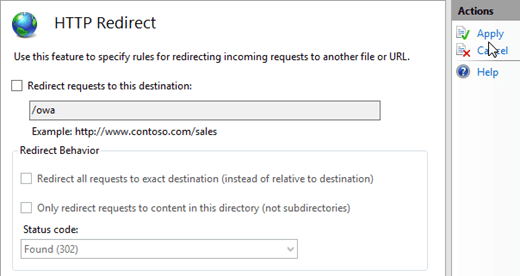
- On the HTTP Redirect page, configure the following settings:
- Select the Redirect requests to this destination check box, and enter the value /owa.
- In the Redirect Behavior section, select the Only redirect requests to content in this directory (not subdirectories) check box.
- In the Status code list, verify Found (302) is selected.When you’re finished, click Apply in the Actions pane.

Note: To perform this procedure on the command line, open an elevated command prompt and run the following command:
1 | %windir%\system32\inetsrv\appcmd.exe set config "Default Web Site" -section:httpredirect -enabled:true -destination:"/owa" -childOnly:true |
Step 4: Use IIS Manager to remove http redirection from all virtual directories in the default website
When you enable redirection on a website in IIS, the setting is automatically inherited by all virtual directories in the website. Because we’re only interested in configuring redirection for the default website, you need to remove the redirect setting from all virtual directories. By default, no directories or virtual directories in the default website are enabled for redirection. For more information, see the Default Require SSL and HTTP Redirect settings in the default website on an Exchange server section.
Use the following procedure to remove the redirect setting from all virtual directories in the default website (including /owa):
- In IIS Manager, expand the server, expand Sites, and expand Default Web Site.
- Select the virtual directory, and verify Features View is selected at the bottom of the page.
- In the IIS section, double-click HTTP Redirect.
- On the HTTP Redirect page, change the following settings:
- Clear the Only redirect requests to content in this directory (not subdirectories) check box.
- Clear the Redirect requests to this destination check box.
- In the Actions pane, click Apply.
- Repeat the previous steps on each virtual directory in the default website.
Note: To perform these procedures on the command line, replace <VirtualDirectory> with the name of the virtual directory, and run the following command in an elevated command prompt:
1 | %windir%\system32\inetsrv\appcmd.exe set config "Default Web Site/<VirtualDirectory>" -section:httpredirect -enabled:false -destination:"" -childOnly:false |
Step 5: Use IIS Manager to restart IIS
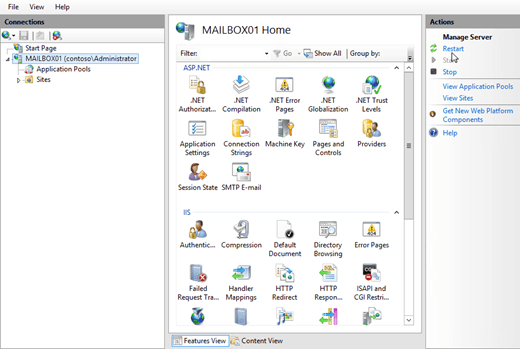
- In IIS Manager, select the server.
- In the Actions pane, click Restart.
Note: You can also perform an IISRESET from and Elevated PowerShell Prompt.
My biggest take away from this was NOT setting the SSL Requirement Properly in the /owa directory when configuring this. By default, the setting is to Require SSL, but to redirect properly, you have to have that Virtual Directory in IIS set to NOT Require SSL. Having the 403 error was driving me crazy. I had to get someone else to look at it, but they didn’t catch it either! That is why I made a point to write this article with the /owa catch in mind. I hope this helps!
HAPPY CONFIGURATION!
POSITIVE LIFE WILL BRING SUCCESS!
REFERENCES:
Configure http to https redirection for Outlook on the web in Exchange Server
Default Require SSL and HTTP Redirect settings in the default website on an Exchange server